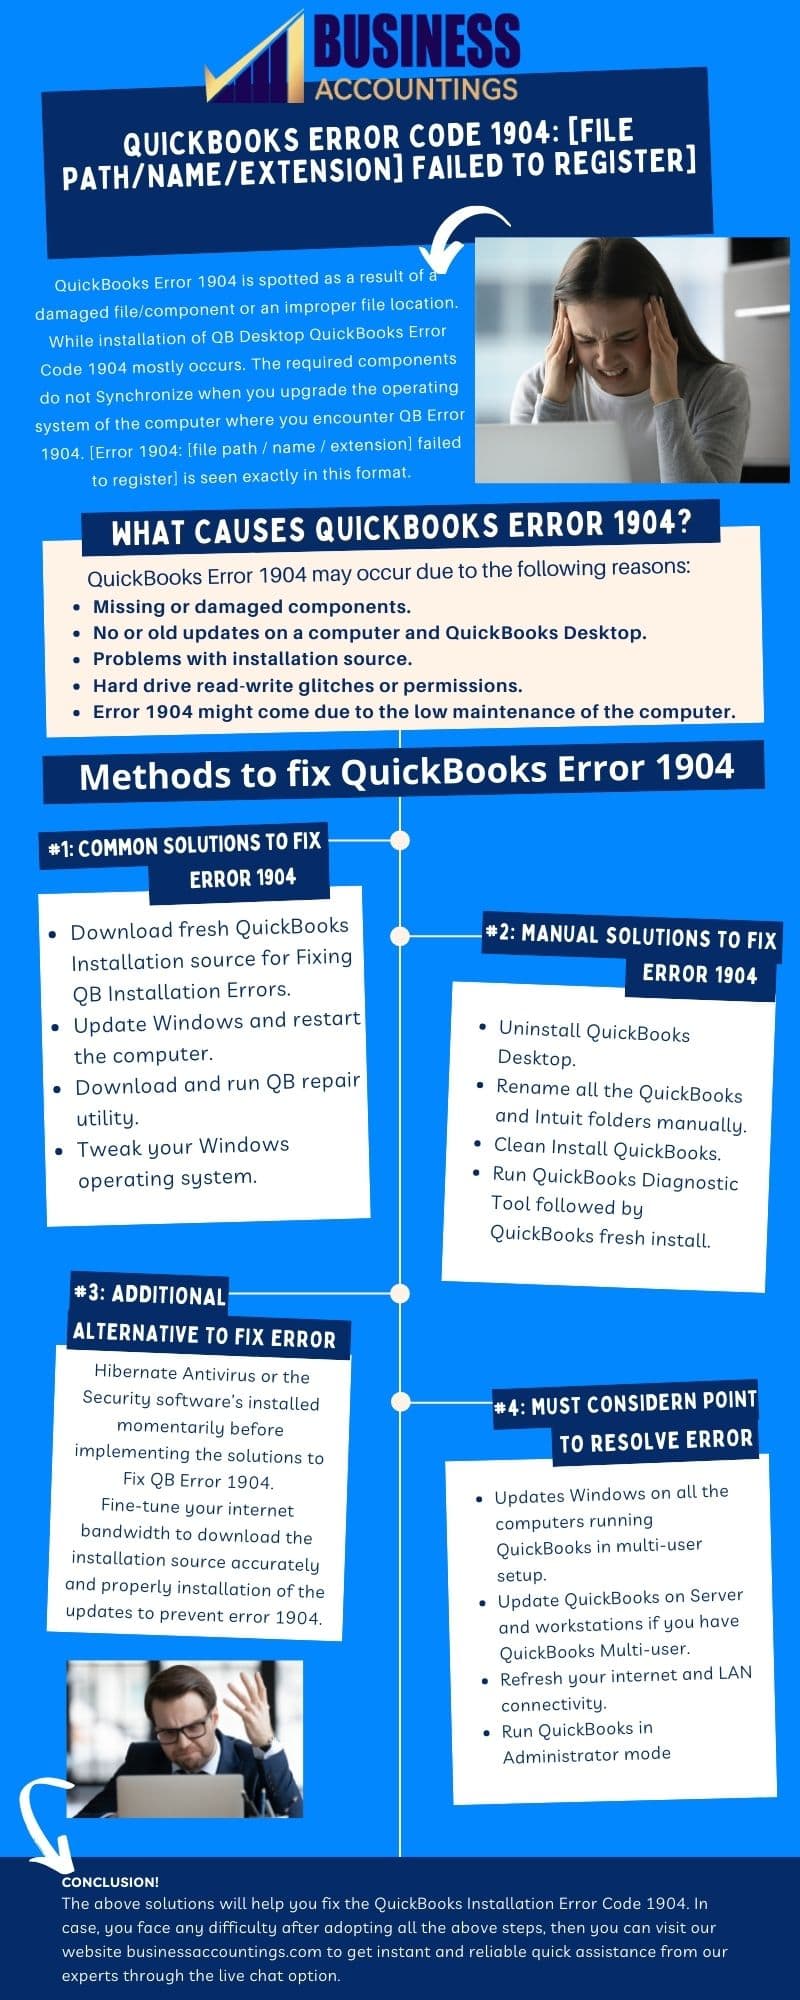
![3 Ways to Fix QuickBooks 1904 Error 2 Error: QuickBooks Error Code 6190
Error message: Error 1904: [file path / name / extension] failed to register](https://www.businessaccountings.com/eehirdoa/2021/09/Quickbooks-error-1904-1.jpg)
What is Error Code 1904 in QuickBooks
QuickBooks Error 1904 is a common error that arises while installing QB just after upgrading the Operating System. As it happens if the system was not rebooted after the QuickBooks upgrade. The error says “Failed to register file path/name/extension”. Don’t worry! You can fix it with ease by running a QuickBooks Install Diagnostic Tool.
Error: QuickBooks Error Code 6190
Error Message: Error 1904: [file path / name / extension] failed to register
QuickBooks Error 1904 is mainly spotted if there is some damaged file/component or due to inappropriate location of the file. It also happens when the required components do not synchronize during your system OS (Operating System) installation. Preferably, it is necessary to reboot the PC after any upgrade/update. In many situations, QuickBooks Error code 1904 is blended with other error codes namely 1935 and 1402. The earlier discussed reasons you most probably can see in QuickBooks Installation error as well.
- QB installation error 1402
- QuickBooks installation error 1326
- QB installation error exe adapter error
- QuickBooks installation error 1602
To get rid of such issues, you simply apply the below-discussed methods as well as resolve the rest of the QuickBooks installation-related errors.
Contents
- 1 What is Error Code 1904 in QuickBooks
- 2 Causes of QuickBooks Error 1904
- 3 What are the signs and symptoms of Error Code 1904 in QuickBooks?
- 4 Important pointers need to be considered before Resolutions
- 5 Common Troubleshooting
- 6 Fix Error 1904 when you install QuickBooks Desktop
- 7 Solutions For Pro & Pro plus Editions
- 7.1 Solution 1: Change the Windows Administrator Account Settings
- 7.2 Solution 2: Running QuickBooks Diagnostic Tool from the Tool Hub
- 7.3 Solution 3: Attempt to activate the built-in or hidden administrator
- 7.3.1 1st step: Activate the Built-in Administrator
- 7.3.2 2nd step: Toggle to the Administrator Account, which is built-in
- 7.3.3 3rd step: Hide the Administrator Account that comes pre-installed
- 7.3.4 4th step: Change the security settings for the installation directory
- 7.3.5 5th step: Install QuickBooks on your computer
- 8 For Premier Editions
- 9 For Enterprise Editions
- 10 For Accountant Editions
- 11 Additional Options for Resolving QuickBooks Error Code 1904
- 12 FAQ
- 13 Infographic of Solutions for Quickbooks Error 1904
It is a common error that users come across during the installation process of QuickBooks. Error 1904 simply occurs when the system gets unstable or any important file gets missing from the database. It is usually caused when a system is not maintained properly and the files get misplaced and hence it causes the entire software to crash. When the error is encountered then it displays an exact format of the error message: Error 1904: [file path/name/extension] failed to register.
Read Also: QuickBooks Error Code 1935
Causes of QuickBooks Error 1904
There are multiple reasons behind the occurrence of QuickBooks Error 1904 that are enlisted below:
- QuickBooks installer file got damaged or is not working due to some reasons
- Missing components of Microsoft Operating system
- Might be using the outdated or expired operating system version
- Security application is not letting you install the QuickBooks
- Upgrading QuickBooks version
- QuickBooks users do not have enough permissions to install QB on Windows
- One can be the reason when there is a new operating system is installed on your device
- Hard-drive read-write having issues.
- The installation source may also create problems to create a location path.
What are the signs and symptoms of Error Code 1904 in QuickBooks?
The following are some of the symptoms users may encounter while using QuickBooks Desktop that has been infected with QuickBooks Error Code 1904:
- The system updates will not be made available automatically.
- Permissions and a variety of other difficulties will plague hard drives and other read-write devices.
- From time to time, important firm files will go missing.
- With the passage of time, the system will become increasingly slow.
- On your screen, you may get a warning that says “Error 1904: [file path / name / extension] failed to register”.
Important pointers need to be considered before Resolutions
Here below are some points that the user needs to consider before moving on to the solution steps:
- All systems running QuickBooks in multi-user mode should have their windows updated.
- If you have a QuickBooks multi-user, you should also update it on the server and workstations.
- QuickBooks should be run in Administrator mode.
- It’s also a good idea to check your internet and LAN connections.

Common Troubleshooting
Before taking any advanced step to solving the issue, you need to take some quick steps. The below listed are a few common ways to rectify QuickBooks Error 1904:
- Restart your QuickBooks Desktop as well as your system.
- Download and run the QuickBooks Repair Utility.
- Update your Windows version with the latest released version
- Download recent QuickBooks Installation source for the installation error.
Fix Error 1904 when you install QuickBooks Desktop
Execute the below troubleshooting methods to easily troubleshoot QuickBooks Error 1904 when you install QuickBooks Desktop:
Method 1: Run QuickBooks Install Diagnostic tool
- First, download and install the QuickBooks Tool Hub from Intuit’s official website
- Next, save the software on your system screen once the download is successfully done
- Now, perform a double-click on the downloaded file and then follow on-screen instructions for successful installation of QuickBooks Tool Hub
- After that, move to the Home screen where you saved your software’s icon
- And then perform a double-click on the same in order to launch the program
- Once the application run then look for the Installation issues option within the Tools hub and select it
- Pick the QuickBooks Install Diagnostic Tool in the next window and this will initiate the tool
- The further process will continue for about 20 minutes
- Finally, you need to simply restart your device and open your QuickBooks Desktop after the process is successfully completed.
Perform the given steps to activate the built-in administrator:
Step 1: Activate the Built-in Administrator
- Initially, press the Windows start button from your console
- And then type “CMD” in the search tab
- Perform a right-click on the “CMD/ Command Prompt/ cmd.exe” and then select the “Run as Administrator” option
- Enter the “net user administrator/active: yes” in the command prompt window and then hit the “Enter” key
Step 2: Switch to the built-in Administrator Account
- Simultaneously press the key “Ctrl + Alt + Delete” from your keyboard
- Next, select “Switch User Windows 8 users” and then click “Windows”
- Now, pick the user icon on the display upper right-side
- And then at a time, you have to press “Ctrl + Alt + Delete” once again
- In the end, select the icon called “Default Administrator Account”.
Step 3: Hide the built-in Administrator Account
- Press the Windows Start button from your keyboard
- Type “CMD” in the open search bar and then make a right-click on the “CMD/ Command Prompt/ cmd.exe”
- Select the tab “Run as an Administrator”
- After that, type “net user administrator/active: no followed by entering the key.
Step 4: Change installation directory security settings
- In the beginning, locate the “C:\Program Files\Common Files”
- Go to the “Common Files/Folder” and perform a right-click on it and then select the “Properties” tab
- Now, go to the “Security” tab and select the “Edit” icon
- After that, select “Users” under the icon named “Group or user names”
- Choose the following to allow the permissions:
- Read and Execute
- Modify
- List Folder Contents
- Write
- Read
- Once done with that then click “Apply” followed by the “Ok” button.
Read Also: QuickBooks Error Code 1334
Step 5: Do try for QuickBooks Installation once again
In this step, you have to perform QuickBooks Desktop installation once again. Once the installation is done then you have to switch to the original user login.
Method 3: Fix Windows Components manually
One can also try another way by repairing some specific Windows components if the above methods do not troubleshoot. This method can only be tried if the user is a confident window or has an IT professional’s assistance for the process.
The two components that need to fix manually are:
- Microsoft .NET Framework
- Microsoft MSXML
Users can either repair these two files or uninstall them and then download the most recent version for them. Once you repair, QuickBooks Error Code 1904 will be fixed completely.
Solutions For Pro & Pro plus Editions
Solution 1: Change the Windows Administrator Account Settings
Perform the steps to modify the settings of the Windows Administrator account:
Step 1: Switch to Windows Administrator Account
For Windows XP Users
- Initially, open the Control Panel
- Perform double-click on the User Accounts tab
- Next, click on the user account name that you wish to change it to an administrator
- Now, click on the option named “Change the account type”
- In the end, select and click on the “Computer Administrator” >>> “Change Account Type” button.
For Windows Vista and 7 Users
- Go to the Control Panel and click on it
- Select User Accounts from the drop-down menu
- Return to User Accounts and select Manage User Accounts
- Find the user account you want to update under the Users for this machine section of the Users page
- Click on the name of the user account
- In the user account window, select the Properties option
- To make the user account an administrator, go to the Group Membership page and pick the Administrator group
- To save the changes, click the Ok button
- To exit the user account settings, click Ok on any remaining windows.
For Windows 8, and 10 Users
- Start with pressing the Windows key and type Control Panel then hit the Enter key
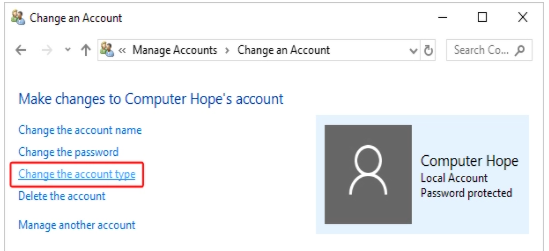
- Go to the User Account tab and click on the “Change account type” option
- Choose an account that you would like to access as an Administrator Rights
- Once you choose a user then click on the “Change the account type”
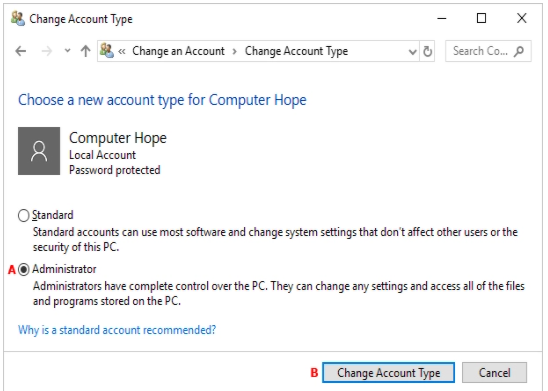
- Next, click on the circle which is next to Administrator followed by clicking on the “Change Account Type” button
For Mac Users
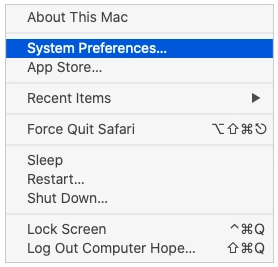
- In the menu bar, open the Apple menu by clicking on the Apple icon
- Move to the System Preferences within the Apple menu
- Next, click on the “Users & Groups” shortcut icon
- Go to the “Users & Groups” tab and click on the “Lock symbol” from the lower-left corner on your screen
- Enter the password followed by clicking on the “Unlock” button, if asked
- After that, select an account that you wish to add administrative privileges on the left side of the window
- End this process by selecting the check-box which is next to “Allow users to administer this account”.
Step 2: Modify the User Permission
In Windows XP, Vista, and 7
- First, press the Windows Start menu and type Windows Explorer
- Next, look for the location C:\Program Files\Common Files
- After that, choose the Properties option by right-clicking on the “Common Files’ Folder”
- Now, move to the Group or User names tab and select “Users”
- Turn on the Modify, Read & Execute, List Folder Contents, Read, Write permissions from the “Permissions for Users”
- In the end, click Apply followed by Ok button to save the user permission.
In Windows 8, 8.1, and 10
- The first step is to access the Start menu in Windows
- In the search box, type File Explorer and then launch the file explorer
- Then look for the C:\Program Files\Common Files
- After that, right-click the Common files folder and go to the properties tab
- In the next step, go to the security tab followed by selecting the modify option
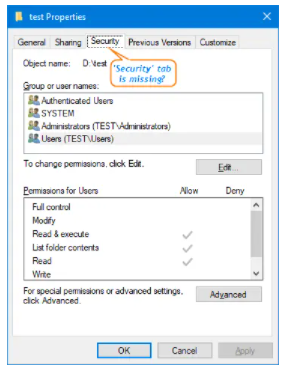
- Moving forward, select users in the group or user names section
- In the permissions for users area, enable the following permissions: Modify, Read & execute, List folder contents, Read, Write
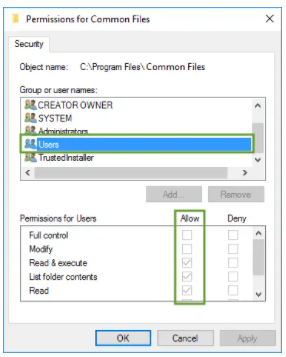
- After that, select apply and press the Ok button.
Step 3: Reinstall QuickBooks and Sign Out
If you need specific instructions for installing a QuickBooks desktop, you should follow these steps. There should be no effect on any current company file data
- Firstly, go to the Start menu in Windows and sign out of the admin account
- The next step is to log in with your regular user account
- Also, go to the Start menu in Windows
- In the search bar, type CMD as well and select Run as Administrator from the context menu of the CMD run icon
- Finally, in the command window, type net user admin/ active: no and hit enter.
If you can open QuickBooks with a standard account, the error should be resolved.
Solution 2: Running QuickBooks Diagnostic Tool from the Tool Hub
Below are the steps to run QuickBooks Diagnostic Tool from Tool Hub:
- From Intuit’s website, download and install the QuickBooks Tool Hub file
- Once the download is complete, save the software to your desktop or another convenient location
- To install the QuickBooks Tool Hub, double-click the downloaded file and follow the on-screen instructions
- After that, go to the home screen and double-click on the new software’s icon to launch it
- Look for the option of Installation issues in the Tools hub and pick it
- Then, in the following window, choose QuickBooks Install Diagnostic Tool
- This will start the tool, which will take roughly 20 minutes to complete
- Once the process is successfully completed then simply reboot the system and try to open your QB Desktop.
Below are the steps to activate built-in or hidden admin effort:
1st step: Activate the Built-in Administrator
To activate the built-in administrator, follow the steps below:
- On the keyboard, press the “Windows” key
- “CMD” should be typed in within the search tab
- Choose “Run as Administrator” from the “CMD/ Command Prompt/ cmd.exe” menu
- Enter “net user administrator /active:yes” in the command prompt window and press the “Enter” tab.
2nd step: Toggle to the Administrator Account, which is built-in
The steps to toggle off the Administrator account, which is built-in, are given below:
- Press “Ctrl + Alt + Delete” on the keyboard at the same time
- Then select “Switch User Windows 8 users” by pressing the “Windows” button
- After that, select the user icon in the upper right corner of the screen
- In the end, press “Ctrl + Alt + Delete” altogether and then select the “default Administrator account” icon.
3rd step: Hide the Administrator Account that comes pre-installed
Steps to hide administrator account that comes pre-installed:
- On the keyboard, press the “Windows” key
- In the search box, type in “CMD”
- Choose the “Run as Administrator” tab from the “CMD/ Command Prompt/ cmd.exe” by right-clicking the menu
- Type “net user administrator /active: no” into the command prompt and press the “Enter” key.
4th step: Change the security settings for the installation directory
Steps to change the security setting for the installation directory:
- Navigate to the “C:\Program Files\Common Files”
- Right-click on the “Common Files” folder and then select the “Properties” option from the menu
- Under the “Security” tab, select the “Edit” icon and then “Users” under the “Group or user names” icon
- Select Allow for the following rights under the “Permissions for Users” tab:
- Modify
- Read and Execute
- List Folder Contents
- Read
- Write
- Then select the “Apply” and “Ok” buttons.
5th step: Install QuickBooks on your computer
Steps to install QuickBooks on your computer:
- Reinstall QuickBooks Desktop if you haven’t already
- Switch to the original user login after installing QuickBooks accounting software.
For Premier Editions
Solution 1: Uninstall then Reinstall Adobe Flash Player
For Windows XP, Vista, and 7 Users
Step 1: Uninstalling the Adobe Flash player
If you’re having trouble with the Adobe Flash Player in your browser, first uninstall the player program and associated files by following the procedures below:
- Start with Installing the Flash Player Uninstaller
- Click the uninstaller icon that appeared in your browser
- If you perform this in Internet Explorer, it will most likely execute automatically
- It may display as a clickable download in the bottom left corner of Chrome; in Firefox, it may appear as a download icon in the upper right corner or as a separate “Downloads” window
- To run the uninstaller program, follow the on-screen instructions
- If the prompt “Do you want to allow the following program to make changes to this computer?” appears, select Yes
- When the uninstaller launches, make sure all open apps are closed before clicking Uninstall to begin deleting “Flash Player”
- Restart the computer if necessary
- Delete all remaining files and folders in the following directories (except for the FlashInstall.log file) (you can copy and paste these file paths into the File Explorer search bar):
- C:\Windows\system32\Macromed\Flash (do not delete the FlashInstall.log file).
- C:\Windows\SysWOW64\Macromed\Flash (if you are using a 64-bit computer; do not delete FlashInstall.log file).
- %appdata%\Adobe\Flash Player
- %appdata%\Macromedia\Flash Player
- Make sure the files FlashPlayerCPLApp.cpl, FlashPlayerApp.exe, and FlashPlayerInstaller.exe in C:\Windows\system32\ (for 32-bit computers) or C:\Windows\SysWOW64\ (if you are using a 64-bit computer) have been deleted
- Your computer’s Flash Player should be completely uninstalled
- To reinstall Flash Player, restart your PC and follow the steps below.
Step 2: Reinstalling and testing the Adobe Flash Player
After you’ve double-checked that the Flash Player software is gone, follow these instructions to reinstall it:
- Make sure your antivirus program is turned off before launching the Flash Player Installer
- Download the latest version of Adobe Flash Player
- To run and install the Adobe Flash Player program, follow the on-screen instructions
- At Adobe’s Flash Software Help site, double-check that the player is installed successfully
- Restart your anti-virus application after you’ve checked that Flash Player is installed correctly.
For Windows 8, 8.1, and 10 users only
Step 1: Uninstalling the Adobe Flash player
- The very first, you have to install the Adobe Flash Player Uninstaller
- In your browser, click the uninstaller icon
- If you use Internet Explorer, this will probably run automatically
- It may display as a clickable download in the bottom left corner of Chrome; in Firefox, the download icon or an isolated “Downloads” box will appear in the upper right corner
- To run the uninstaller program, follow the on-screen instructions
- If the notification “Do you want to let the following program make changes to this computer?” appears, you simply have to select the “Yes” button
- When the uninstaller appears, make sure all open apps are closed before clicking Uninstall to begin the Flash Player removal process.
- In the next step, your system should be restarted
- Your computer’s Flash Player should be completely deleted and restart your PC.
Step 2: Adobe Flash Player is being reinstalled and tested
Following these procedures to reinstall Flash Player after you’ve double-checked that it’s gone:
- Before running the Flash Player Installer, make sure your antivirus application is turned off
- Get the most recent version of Adobe Flash Player
- Follow the on-screen directions to run and install the Adobe Flash Player application
- Double-check that the player is installed correctly at Adobe’s Flash Software Help webpage
- After you’ve double-checked that Adobe Flash Player is installed successfully, restart your antivirus program.
For Mac Version
Step 1: Deauthorized Flash on your Mac
- First, go to the System Preferences >>> Flash Player
- In the top right of your screen, click on the Advanced tab
- After that, choose the Deauthorize This Computer.
Step 2: Completely uninstall or remove the Adobe Flash
- Select Applications in the Finder window, then Utilities (or search for the app Adobe Flash Player Install Manager).
- Click Uninstall in the Adobe Flash Player Install Manager.
- When it’s successfully removed, you’ll receive a notification.
Solution 2: Refer to the QBversionTool.dll
When the error notice mentions the QBversionTool.dll file, then implementing this solution is appropriate. After running the QuickBooks install the diagnostic tool and changing the admin settings as described above, you should proceed to the steps below:
Step 1: Make sure your permissions are correct
- To begin, go to the Start menu on your computer
- Then, in the search field, type in Notepad and click Open
- Next, in the note, type QBTEST
- After that, select Save as from the File menu
- Save it to “C:\Program Files\Common Files” or “C:\Program Files(x86)\Common Files“.
If you are unable to save the note to the folder, he or she may be required to login in as an administrator and install QuickBooks.
Step 2: Install your QB as an Administrator
- To do so, enter the Windows start menu and then choose the sign-out option
- The next step is to login in with the account that says admin
- It’s worth noting that the password should not be present
- And finally, try to install QuickBooks as an administrator.
For Enterprise Editions
Solution 1: Manually fixing the Windows Components
To fix some specific Windows components from within the system This step should only be attempted if you are a skilled Windows user or have the assistance of an IT professional. The two components that must be manually repaired are:
1. Microsoft MSXML
Fix the damaged MSXML by registering the MSXML DLL files
Step 1: Register MSXML on a 64-bit operating system by following the procedures below:
- Type cmd into the Windows Start menu
- Select Run as Administrator from the context menu when you right-click cmd
- Enter cd\windows\syswow64 at the C: prompt
- Press Enter after typing regsvr32 MSXML6.dll
- Install QuickBooks Desktop on your computer.
Step 2: On a 32-bit operating system, run the following instructions to register MSXML:
- Press Windows + R on your keyboard to launch the Run command
- Press Enter after typing cmd
- Press Enter after typing regsvr32 MSXML6.dll
- Install QuickBooks Desktop on your computer.
2. Microsoft .NET Framework
QuickBooks Desktop runs web-based apps using Microsoft programs. Microsoft.NET Framework is one of them. QuickBooks may not function properly if the.NET Framework is malfunctioning.
Windows XP, Vista, and 7
- All open programs should be closed
- Open the Windows Start menu by pressing the same from your keyboard
- Open the Control Panel by typing “Control Panel” into the search box
- Select Uninstall a Program from the drop-down menu
- You’re not uninstalling anything, so don’t be concerned
- Turn Windows features on or off by selecting Turn Windows features on or off
- On the list, looks for.NET Framework.
Check the.NET Framework 3.5 SP1 and.NET Framework 4.5 settings (or later).
Check out the.NET Framework 3.5 Service Pack 1 (SP1)
If you don’t have the.NET Framework 3.5 SP1 checkbox selected:
- To enable.NET Framework 3.5 SP1, click the box
- To save your changes, select Ok
- Your computer should be restarted.
If the .NET Framework 3.5 SP1 checkbox is already selected
- Deselect it to disable .NET Framework 3.5 SP1 and turn it off and don’t turn it back on.
- To save your changes, select Ok
- Your computer should be restarted
- After you’ve re-signed to Windows, follow the procedures to re-enable .NET Framework 3.5 SP1
.NET Framework 4.5 is a must-have (or later)
If the Microsoft.NET Framework 4.5 (or later) isn’t listed, follow Microsoft’s instructions to install it.
Repair Microsoft.NET Framework 4.5 (or later) if it appears on the list:
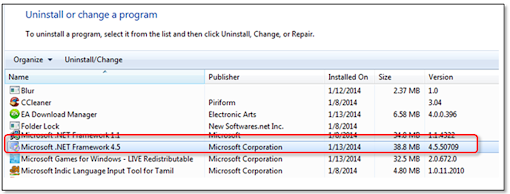
This is a list of programs in Windows that you can uninstall
- Select Microsoft.NET Framework 4.5 from the Programs and Features window (or later) Then choose Uninstall/Change from the drop-down menu
- Select Next after selecting Repair
- Follow the prompts instructions that appear on your screen
- Restart your computer once the fix is complete.
If repair is successful, open QuickBooks again. If everything works, the error is fixed.
Windows 8, 8.1, and 10
- Make sure that you close all your open programs
- Next, launch the Windows Start menu by pressing the same
- Open the Control Panel by typing “Control Panel” into the search box
- Select Programs and Features from the left-hand menu
- Uninstalling a Program is the option you’ll want to go with
- You’re not uninstalling anything, need not have to worry
- Choose whether to enable or disable Windows features
- In the list, look for the .NET Framework.
Also, make sure that both .NET Framework 4.5 (or later) and .NET Framework 3.5 SP1 options should be checked.
Verify NET Framework 4.5 or later
If you don’t have the.NET Framework 4.5 (or later) checkbox selected:
- To enable.NET Framework 4.5, check the box (or later)
- To save your changes, select Ok
- Your computer should be restarted.
If the checkbox for.NET Framework 4.5 (or later) is already selected:
- To disable .NET Framework 4.5, check the box (or later)
- Turn it off and don’t turn it back on
- To save your modifications and then select Ok
- Your computer should be restarted.
- In the end, when you’ve re-signed into Windows, follow the procedures to re-enable the .NET Framework 4.5
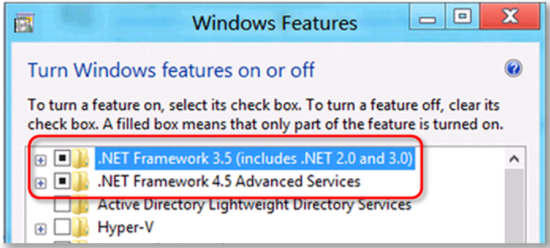
Also, verify NET Framework 3.5 SP1
If the checkbox for .NET Framework 3.5 SP1 isn’t checked
- Start with, choosing it to enable .NET Framework 3.5 SP1
- To save your changes, select Ok
- And finally, your computer should be restarted.
If the checkbox for .NET Framework 3.5 SP1 is already selected:
- To disable .NET Framework 3.5 SP1, click the box
- Turn it off and don’t turn it back on
- To save your changes, select Ok
- After that, make sure that your computer should be restarted
- After you’ve re-signed to Windows, follow the procedures to re-enable .NET Framework 3.5 SP1.
You can either repair these two files or remove them and get the most recent version for them. QuickBooks Error Code 1904 will be entirely resolved after they are corrected.
Solution 2: Adding QuickBooks to Bitdefender Exclusion List
If you’re using Bitdefender, this solution will only work for you. You can’t just disable the error to get rid of it. In this scenario, you’ll need to add QB to Bitdefender’s exclusion list.
Follow the step to narrow down the issues and fix QuickBooks Error Code 1904:
- Go to the System Tray and then locate the Bitdefender
- Do a right-click on the Bitdefender and then select the “Disable” option
- Now, add the following to the Bitdefender Exclusion list
- For 32- bit Windows OS: Put C:\Program files\Common files
- For 64-bit Windows OS: Put C:\Program Files\Intuit (C:\Program Files(x86)\Intuit)
- Again, do a right-click on the Bitdefender icon in the System Tray
- After that, select the option called “Enable to turn on Bitdefender”
- In the end, Bitdefender Antivirus has been taken care of so you can begin the QuickBooks installation process.
For Accountant Editions
Solution 1: Activate Hidden Admin Account
On Windows XP, Vista, and 7
The account was created in Windows 7 or Vista, but you can’t use it because it isn’t enabled. You can enable administrator mode with a simple command if you’re debugging something that requires it.
- To begin, right-click and select “Run as administrator”
- Or use the Ctrl + Shift + Enter shortcut from the search box to start a command prompt in administrator mode
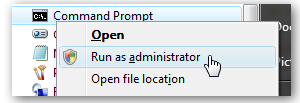
- Now type the following command into the command prompt:
- net user administrator /active:yes
- You should get a notification indicating that the command was successful
- After you log out, the Administrator account will appear as an option
- You’ll notice that this account has no password, so if you want to keep it enabled, you’ll need to change it
- Make sure you’re logged in as your regular user account first, then use the steps above to open an administrator mode command prompt
- Type the following command in the prompt:
- net user administrator /active:no
- The administrator account has been disabled and should no longer appear on the login screen.
On Windows 8, 8.1, and 10
- To start Command Prompt as administrator on Windows 10, type “cmd” in the Search box
- Next, do a right-click on the search result Command Prompt, and select “Run as administrator”
- To run it, type net user administrator /active: yes into the command prompt and click Enter
- If you go back to the login screen, you’ll notice that the Administrator account is there and also it can log in to the system without a password
- This method is straightforward and quick, especially if you’re using Windows 10 Home and can’t access the Local Users and Groups or Local Security Policy.
To make the built-in Administrator account in Windows 10 invisible, follow these steps:
- Open the Command Prompt as an administrator
- Enter the following command: net user administrator /active: no and then press the Enter key.
For Mac version
- To begin, log in to the computer using an administrator account
- Launch Terminal and type the following command, confirming your identity when prompted
- Create the admin account as you normally would in the Users & Groups preferences pane
- Select Advanced Options from the context menu when right-clicking on the newly established user account
- We’ll change two pieces of information from the advanced menu: UserID and Home directory
- Keep in mind that each user’s number must be unique
- Enter a new path for the user’s home directory that is not in the typical position “/Users” under the Home directory
- To preserve your changes, click the Ok button once you’ve made both of these changes
- The account has been created successfully
- However, we must make one more adjustment to the system by going to Login Options
- Also, check the box next to Name and password in the Display login window
- Close System Preferences and return to the Users & Groups preference after relaunching it to make sure the new account is hidden
- The account should now be hidden from view as well as from the login window.
Solution 2: Download and Run the QuickBooks Repair Utility
Step 1: Download the QuickBooks component repair tool
- This tool can be downloaded by first closing all open programs
- After that, you’ll need to download the setup file for the QuickBooks component repair tool
- To complete the installation procedure, double-click the file and follow the on-screen instructions
- The tool must then be run after the machine has been rebooted.
Step 2: steps to utilize the component repair tool in QuickBooks
- Before using the tool, you must first reboot your computer.
- Next, make sure that all open programs should be closed
- Follow the steps above to download and install the QuickBooks component repair tool
- You will diagnose and resolve the problem on your own
- Last but not least, restart the computer.
Visit our www.businessaccountings.com to get more resolutions or troubleshooting to fix QuickBooks Error code 1904 for QuickBooks Accountant Editions. Meanwhile, you can use Live Chat to get all your queries resolved.
Additional Options for Resolving QuickBooks Error Code 1904
Here are some additional solutions to resolve QuickBooks error code 1904. which are listed below:
- Users are advised to hibernate antivirus or security software to resolve this issue.
- Try to fine-tune internet bandwidth to accurately download the installation source and perform proper update installation to avoid this issue.
- Also, the shared updates option should be unchecked in a multi-user configuration.
- If you’re only using the QuickBooks database server management, the solutions above won’t work, and you’ll have to download and install the actual executable.
- When the installation is not set to execute as administrator, this type of error can also occur with Microsoft Windows.
- Additionally, you must ensure that the exe is installed on the server before installing Avalara AvaTax.
- If you try to install the connector on a server that doesn’t have QB.exe installed, you’ll get an error like this.
- It is then suggested that you click OK on the error, and the installation should complete successfully.
- Go to File > AvaTax > Configuration to access the AvaTax configuration.
- Then start QuickBooks as an administrator.
- Also, select the option to test the connection.
In Conclusion!
I hope, that the above-discussed rectification methods are enough for you to rectify QuickBooks Error 1904 with ease. After applying the above list of methods, your error will resolve but at some point in time, you may not be able to fix this issue even after the aforesaid quick and precise methods. In that case, you can seek Expertise assistance to easily rectify your queries related to QuickBooks.

Get Expert’s Advice to Fix Your All Accounting & Bookkeeping Problems
FAQ
-
What are the symptoms of QuickBooks Error 1904?
Ans: You might be experiencing several symptoms when QuickBooks gets infected with error code 1904:
The updates on your system will not be available automatically
Important QuickBooks company file got missing
Hard drive or other read-write devices face difficulties with permissions and several other glitches
Your device keeps sluggish as time passes
You might encounter a repeated error message on your screen stating that “Error 1904: [File path/name/extension] failed to register -
What are the manual ways to rectify QuickBooks Error 1904?
You can manually fix this QB error code 1904 by:
Uninstalling your QuickBooks Desktop
Cleaning Install QuickBooks
Manually renaming all QB and Intuit folders
Running QuickBooks Diagnostic Tool followed by the QB Fresh Install. -
What to do if the QuickBooks Error 1904 message refers to the QBversionTool.dll file?
In this situation, you are supposed to run QuickBooks Install Diagnostic Tool and then change the admin settings by carrying out the following steps:
Step 1: Test the QuickBooks permissions
Step 2: Install the QB as an Admin.
Infographic of Solutions for Quickbooks Error 1904
