What is Error 6000, 77 in QuickBooks & How to Fix it
Intuit suggests basic troubleshooting: Rename .ND and .TLG files, Run the File Doctor, Configure Firewall and Security software when QuickBooks Error 6000 77 appears. The error indicates your company file is stored in an inappropriate folder. There are multi-faceted reasons that are responsible and the most important QuickBooks being used in a multi-user environment.
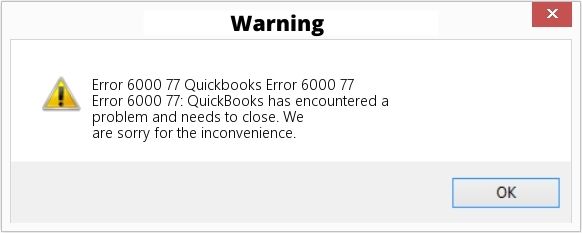
Error: QuickBooks Error 6000 77
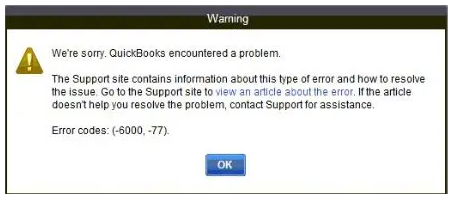
Error Message: We’re sorry. QuickBooks encountered a problem. Error codes: (-6000, -77).
Listen to the specific part

00:00
What is error code 6000, 77

00:08
Causes of QB error 6000, 77

00:51
Solutions of the error 6000, 77
QuickBooks is accounting software introduced by Intuit that can handle the financial data of small to mid-sized organizations. It has a variety of features to cater to the demands of users and make the app more user-friendly. However, just like any other piece of software, the application may encounter faults and flaws that cause it to malfunction. QuickBooks Error 6000 77 is one such error that users commonly experience. When a user attempts to open a company file that has been saved in an incorrect folder, an error message appears. In this blog post, we’ll go over the possible reasons for QuickBooks error code 6000 77, as well as troubleshooting techniques to fix it.
Contents
- 0.1 What is Error 6000, 77 in QuickBooks & How to Fix it
- 0.2 What is Meant by QuickBooks Error 6000 77?
- 0.3 What Causes QuickBooks Error -6000 -77
- 0.4 Common Troubleshooting to Fix QuickBooks Error -6000 -77
- 1 Experts Suggested Solutions to Overcome QuickBooks Error -6000 -77
- 1.1 Solutions of QuickBooks Error -6000, -77 for PRO & PRO Plus Editions
- 1.2 Solutions for QuickBooks Error -6000 -77 in Premier Editions
- 1.2.1 Solution 1: Perform a Re-installation of QuickBooks Desktop
- 1.2.2 Solution 2: Replace Mapped Drive with UNC Path
- 1.2.3 Solution 3: Download and Run the QuickBooks Database Server Manager to overcome the QuickBooks Error -6000 -77
- 1.3 Solutions for QuickBooks Error -6000 -77 in Enterprise Editions
- 1.4 Solutions for QuickBooks Error 6000 77 in Accountant Editions
- 1.4.1 Solution 1: Perform modifications in the Firewall & Security Software Settings
- 1.4.1.1 Step 1: Choose Security Settings
- 1.4.1.2 Step 2: Allow programs through the Firewall manually
- 1.4.1.3 Step 3: Generate a Rule to enable services
- 1.4.1.4 Step 4: Enable logging to view denied incoming connections
- 1.4.1.5 Step 5: Ensure Firewall is enabled
- 1.4.1.6 Setting Up a Firewall: Mac OS X 10.2.x – 10.5.x
- 1.4.1.7 Setting Up a Firewall: Mac OS X 10.6.x and above
- 1.4.2 Solution 2: End all the QuickBooks tasks using the Task Manager
- 1.4.3 Solution 3: Download the latest release of QuickBooks
- 1.4.1 Solution 1: Perform modifications in the Firewall & Security Software Settings
- 1.5 Infographic to Resolve The QuickBooks Error -6000, -77
- 1.6 FAQs
- 1.6.1 How to restore the backup file of QuickBooks if there is damaged data while fixing the QuickBooks error 6000, 77?
- 1.6.2 Does this QuickBooks error 6000, 77 happen in any of the QuickBooks desktop versions or editions?
- 1.6.3 How to download and run the QuickBooks Database Server Manager if there is an issue with it and encounters the QuickBooks error 6000, 77?
What is Meant by QuickBooks Error 6000 77?
QuickBooks error -6000, -77 is a 6000 series code which frequently arises when a file is saved in the wrong folder. In recent years, accounting standards and software have changed the way entrepreneurs conduct their accounting operations. However, this issue occurs when you don’t have enough permission to view any QuickBooks file. Users must remedy this issue as quickly as possible, since it may result in serious data loss. So, if you encounter such an error, don’t ignore it and make sure to fix it as soon as possible. For a quick fix, you should re-launch the QuickBooks desktop with administrator access. This will save you a lot of time.
What Causes QuickBooks Error -6000 -77
QuickBooks error -6000, 77 can be caused by a variety of circumstances, including the following:
- The issue is also more likely to occur if the company file is damaged or corrupted.
- If you don’t have enough authorization to access the server system, you’ll get this error.
- This error can also occur if the company file you’re trying to open is corrupted or missing.
- If QuickBooks is not updated to the newest release.
- If you’re using an old version of QuickBooks, you’re more than likely to see this problem.
- If you try to open the company file from a mapped device, you will receive QuickBooks Error 6000 77.
- Additionally, if the company file is saved on external storage rather than on a local disc or a network.
Important tips before resolving the Error 6000, 77 in QuickBooks Desktop
- Check that QuickBooks is up to date
- Backup your QuickBooks company files first before proceeding
- You must try to restart your software and computer also
- If your QuickBooks file is stored in external storage then transfer it to local drive and then open your company file
- You can do repair your QuickBooks software.
QuickBooks is Unable to Send Emails Due to Network Connection Failure
Common Troubleshooting to Fix QuickBooks Error -6000 -77
- More permission can be added by restarting the QuickBooks software. The issue is usually erased after the software is restarted, and no more effort is required.
- A QuickBooks file doctor tool is available for use. This software can fix QuickBooks files that have been damaged or corrupted. When the program tries to recover a QuickBooks file and rectify the issue, it occasionally fails. This is due to the technology’s poor and rudimentary foundation.
- If the company file was previously saved on an external storage device, you will be needed to move it to a local or network drive. To see if the error has gone away or if it still persists, open the QBW file in QuickBooks.
- If the company file refers to a mapped drive, you must adjust the settings and choose the correct server. To accomplish this,
- Go to the File menu and select open or restore
- Then click on Network Place and pick to open a company file
- You must also select the server where the company file is stored by clicking on the entire network
- Finally, double-check that the solution worked before restarting QuickBooks.
Experts Suggested Solutions to Overcome QuickBooks Error -6000 -77
The below listed are the multiple ways to amend the error quickly with much ease. Moreover, it works for different editions of QuickBooks and its versions. Let’s check out one by one:
Solutions of QuickBooks Error -6000, -77 for PRO & PRO Plus Editions
Solution 1: Fix the damaged company file folder
Recreating the folder can fix the damage. The listed below steps will help you to recreate the folder:
For Windows Version
- First, go to the C: drive in
- Windows XP, Vista, and 7
- Click on the Windows Start menu and type “Windows Explorer”
- It will open the Windows Explorer
- On the left side of the window is an icon named “Local Disk (C)”
- Windows 8, 8.1
- Start typing in the Start screen of Windows 8 to search your computer; you don’t need to look for and click a search box
- In the search results, type “C:” and a link to your hard drive will display
- To open the drive in a File Explorer window, click on it
- Windows 10
- In Windows 10, “My Computer” has replaced with “This PC”
- Your File Explorer should appear on your Taskbar by default; its icon resembles a file folder
- If you don’t have access to that shortcut, type “This PC” or “File Explorer” into the search box
- In the next step, type “C:” into the same box to get to your C: drive.
- Windows XP, Vista, and 7
- Next, create a new folder
- Now, open the folder containing the company file
- Look for the company file with .qbw extension
- Do a right-click on the .qbw file followed by selecting the “Copy” option
- Open a new folder and then paste the file
- Now, you have to set the permissions in order to share the company files
- At last, open your QuickBooks along with the file from a new location.
For Mac version
- On the C: Drive, make a new folder
- Open the folder in which the data for the company file is saved
- Find the “.qbw” file and double-click on it
- Select “Copy” from the context menu when you right-click on the.qbw file
- Make a new folder by right-clicking and choosing new > folder
- In the new folder, paste the “.qbw file”
- After that, create an “Access” account with Windows permissions
- So that the company file may be shared and questions can be answered
- From the new file location, open the QuickBooks file.
Solution 2: Remove the blank spaces after the company name and before the company file extension
- On computers when QuickBooks is open, you should first log out of the QuickBooks desktop software application
- In the next step, you have to open the company file
- To rename a QuickBooks company file, do a right-click on it and select rename from the menu
- Select the firm file’s name and type it in
- Also, make sure there are no spaces between the file extension and the company name, and then eliminate any spaces between the file extension and the company name
- Lastly, create a new company file in QuickBooks.
Solution 3: Copy the QB file on your Desktop or another location
- Go to the folder where the QuickBooks company files are located in File Explorer
- Choose the file with the .qbw extension
- Then do a right-click on the file and select “Copy” from the menu that appears
- Right-click on the Desktop and choose Paste from the menu
- Your file was copied and put there
- To open QuickBooks Desktop, hold down the Ctrl key and then double-click on the icon
- Hold the Ctrl key down until you see the “No company open” window
- To check for issues, open the company files with the desktop location where you passed your company file.
While Using Quickbooks Pro & Pro Plus Addition, you faced error 6000, 77 & tried above mentioned solutions but didn’t succeed. So, you want experts advice for 6000 series error code called QuickBooks Error -6000 -77, you can connect with QuickBooks team of Experts by Call Now or via Live Chat.
Solutions for QuickBooks Error -6000 -77 in Premier Editions
Solution 1: Perform a Re-installation of QuickBooks Desktop
When other troubleshooting approaches have failed, reinstalling QuickBooks is a viable option. When you reinstall QuickBooks, it deletes and recreates all of the previous installation files. This entire process is called Clean Install Tool. This aids in the restoration of the corrupt files that were the true cause of the issue.
To resolve QuickBooks problem -6000 -77, follow the steps outlined below to install a fresh copy of QuickBooks using the QuickBooks Clean Install Tool. It mainly involves 3 steps:
For Windows Version
Step 1: Prepare your PC to install/reinstall QB
The below outlined will walk you through installing a new version of QuickBooks on your PC or reinstalling an old version as part of a debugging or fault recovery process.
In this scenario, simply deleting the previous version may not be sufficient. The below steps will walk you through two approaches for preparing your PC so that nothing goes wrong during the installation.
Step 2: Use the Intuit’s QuickBooks Clean Install Tool
- First, download the QB Clean Install Utility.exe file and save it to your desktop
- Next, you have to open the QuickBooks Clean Install Utility.exe
- Now, click on the option “I Accept” on the license agreement
- Choose an appropriate QuickBooks version followed by clicking “Continue” to begin
- When you receive “QuickBooks is now ready for a clean install, please install to the default directory” notification, click the “Ok” button
Step 3: Setup your PC for a Clean Install manually
If you don’t want to erase files before installing the new application, you can manually rename the QuickBooks installation folders using the following methods if you don’t want to use automated delete programs like QuickBooks Clean Install Utility.
Rename the QB installation folders manually:
Each of the folder locations given for your Windows version can be found and renamed using Windows Explorer. Normally, you’d append the words “old” or “damaged” to the folder’s name. QuickBooks will not be able to recognize the folder and generate a new one as a result of this.
Windows Vista, 7, and 8
QuickBooks 2007 and later folders:
- C:\ProgramData\Intuit\QuickBooks (year)
- C:\Users\(current user)\AppData\Local\Intuit\QuickBooks (year)
- C:\Program Files\Intuit\QuickBooks(year)
64-bit version
- C:\Program Files (x86)\Intuit\QuickBooks (year)
In case, you receive an error notification [Access denied when renaming folders]
- Select Task Manager from the context menu of the Windows Taskbar
- Select the “Processes” tab from the drop-down menu
- To sort processes alphabetically by name, click the Image/Name/Column heading
- In the Image/Name/Column, select QBDBMgrN.exe, QBDBMgr.exe, QBCFMonitorService.exe, and Qbw32.exe
- End the procedure by clicking the “Finish” button
- [WARNING: Terminating a process can result in unintended consequences such as data loss and system instability….] Click “Yes” to the notification.
In case, if you can’t find the Application Data or Program Data folder.
Windows XP, Vista, and 7
- To open the Computer window, use Windows + E on your keyboard
- Click the Organize button in the upper left corner
- Select Folder and Search Options from the drop-down menus
- Toggle to the View tab
- Select Show hidden files and folders from the drop-down menu
- Click the OK button.
Window 8, 8.1, and 10
- To open the Computer window, use Windows + E on your keyboard
- At the top of the window, select “View”
- Select the tab named “hidden items”.
For Mac version
Reinstall QuickBooks for Mac using Clean Install Tool
If reinstalling QuickBooks does not resolve the problem, you can perform a clean installation. This uninstalls QB together with any installation files that were left behind, allowing you to reinstall the program from scratch. The steps involved:
Step 1: Uninstall QuickBooks Mac Desktop
Have your QB Desktop download file (or installation CD) and license numbers handy before you remove QuickBooks Desktop.
- Start with closing your QB
- Select “Applications” from the Finder menu
- Delete the QuickBooks icon by dragging it to the Trash.
Step 2: Remove the QB PLIST files
The .plist is the file extension for *preference files that store registration and any preferences specified inside QuickBooks.
User PLIST
- Select Finder from the menu bar
- Select Library while holding down the Option key
- Go to the Preferences folder and open it
- Locate any PLIST files that contain com.intuit.QuickBooks20XX and delete them
Note: The QuickBooks version you’re using is “XX”
- Take out the trash.
Step 3: Restart your system
Step 4: Reinstall your QuickBooks
Not only can spaces and special characters in the file name create QuickBooks error 6000 77, but they also cause a slew of other problems. The following steps should be followed to remove the blank spaces and special characters:
- Use the CD installer or download the QuickBooks Desktop for Mac edition (if purchased from a retailer)
- All applications should be closed
- Open the installer or place the disc in the CD drive on your Mac
- Automatically, the QuickBooks installation window appears
- Add the QuickBooks icon to the Applications folder by dragging it there
- Automatically, the Applications folder appears
- To start the application, click on the QuickBooks icon.
Solution 2: Replace Mapped Drive with UNC Path
- Begin by right-clicking on the QB icon and holding down the Ctrl key
- From the drop-down menu, select “Run as an Admin”
- Then hit and hold the “Ctrl” key to bring up the “No company” window
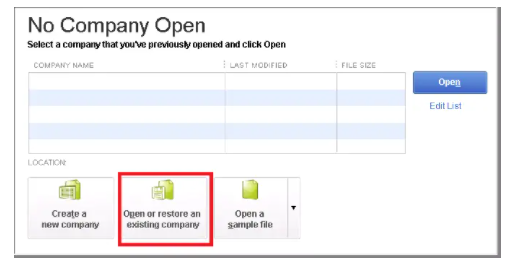
- Open or restore the company, as well as a company file by going to the File menu
- After that, press the Next button
- From the left-hand pane, choose the network
- Go to the corporate file’s folder location.
- The last step is to change the permissions on the folder and then access the company file.
Solution 3: Download and Run the QuickBooks Database Server Manager to overcome the QuickBooks Error -6000 -77
The error can also happen if the Database Server Manager is corrupted or damaged, or if your QuickBooks account is not installed on your server or network. The QuickBooks Database Server Manager must then be downloaded and run.
The procedure is as follows: –
- To do so, you’ll need to get the QuickBooks Tool Hub and install it then save the file after downloading the tool
- Locate the saved file and double-click it to begin the installation process
- To finish the installation, follow the on-screen directions.
- After the installation is complete, go to the tool hub icon
- Right-click the icon and choose Run as Administrator from the context menu
- A pop-up message will appear on your screen asking you to make system modifications
- After that, click the “Yes” button to proceed
- Select “Network Issues” from the drop-down menu
- Select “QuickBooks Database Server Manager” from the drop-down menu
- Once done with that, scan your company file
- Select Scan Folders from the drop-down menu
- Then choose “Browse” from the drop-down menu
- Select the folder containing your company’s files
- To begin scanning, press the “Ok” button
- After the scan, resolve the issues, and you’re done with the entire process.
To get in touch with QuickBooks Professional, CALL NOW or Do a LIVE CHAT if you still have any doubts or queries to overcome QuickBooks Error -6000 -77 for Premier Editions.
Solutions for QuickBooks Error -6000 -77 in Enterprise Editions
Solution 1: Making use of QuickBooks File Doctor Tool
To overcome this 6000 series error code, you can download and run the QB File Doctor tool. This tool is designed to fix issues that appear due to the corruption in the company file and configuration issues in the network. In order to access the QuickBooks File Doctor Tool, you are supposed to download and install the QuickBooks Tool Hub first.
For Windows Version
Let’s check out the complete process for your different Windows versions:
Step 1: Download QuickBooks Tool Hub
If you’re using an older version then you need to download the tool hub separately from Intuit’s official website. Once you successfully downloaded the appropriate version then process further with the below steps:
In Windows XP, Vista, and 7
- Open the downloads folder by pressing the Windows Start button on your keyboard
- It will open a panel where you have to look for the Windows Explorer
- Once you click on the same, it will display the Downloads option which is usually located on your right side of the same panel
- Within the Downloads folder, find the file named “QuickBookstoolhub.exe”
- Next, run the downloaded exe file by double-clicking on the same
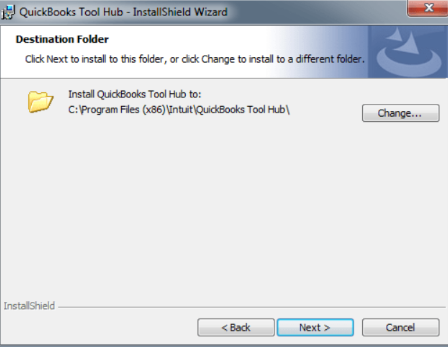
- Now, choose the destination folder to install the tool and then hit “Next”
- After that, accept the on-screen appeared License Agreement followed by selecting the “Yes” button
- Once done then click on the “Install” option and wait till it displays “Install Shield Wizard Completed” windows
- Put a check-mark on the option called “Launch” and then hit the “Finish” button
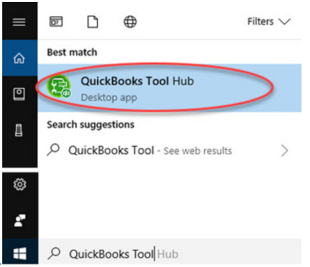
- In case, you’re unable to launch the Tool Hub then you can search it using your Windows Search Bar and select the tool from there.
In Windows 8, 8.1, and 10
- Open the Downloads folder by visiting the Taskbar >>> File Explorer
- Click on the same to open the File Explorer
- Next, move to the Downloads folders which are located on the left-side panel
- Now, look for the downloaded file named “QuickBookstoolhub.exe”
- Double-click on the downloaded exe file to run the same
- To install the tool, select the destination folder and then click “Next”
- After that, accept the License Agreement that appears on the screen by clicking the “Yes” option
- After that, select “Install” and wait for the “Install Shield Wizard Completed” windows to appear
- Put a checkmark next to “Launch” and then press the “Finish” button
- If you can’t get the Tool Hub to open, try searching for it in the Windows Search Bar and selecting the tool from there.
Step 2: Run the QuickBooks File Doctor from the Tool Hub
- To get to the No Company Open window, open QuickBooks until you reach there
- Select the File option from the drop-down menu
- Choose Repair File and Network Problems from the utility menu
- You must click “Ok” in a dialogue window that appears
- The QuickBooks File Doctor application will be restarted with the administrator
- Select “Yes” from the dialogue box
- Open the QuickBooks File Doctor application by clicking on the wrench icon
- When you click Continue, QuickBooks File Doctor will urge you to log into your file and begin repairing it
- Select File from the Advanced Settings menu and look for any problems or repairs that are required
- If the system prompts you, click Next, and then open the file
- Examine the area for any potential problems or repairs that may be required
- Finally, using QuickBooks File Doctor, you can check for problems or corrections in your file without having to worry about QB.
For Mac version
The QuickBooks File Doctor tool is a simple file repair tool that you can use to resolve mistakes you find while using the QuickBooks accounting software. Only QuickBooks 2016 and later versions have this tool integrated or built-in. To upgrade QuickBooks to the most recent version, go to the QuickBooks file doctor download page on the Intuit website and follow the instructions. Another thing to keep in mind is that this tool only works with the UK and US versions of QuickBooks, but it is compatible with all Windows-based QB versions. However, it is not currently compatible with Mac versions of QuickBooks.
Solution 2: Rename the file extension called .ND and .TLG
The configuration files .ND and .TLG enables QuickBooks Desktop to access company files across a network or in multi-user mode. Damaged or tampered with. When opening QuickBooks Desktop, .ND or .TLG files can create issues. Data is not lost when you rename these files since they are immediately regenerated when you open or scan the company files with QuickBooks Database Server Manager.
- In this procedure, the first step is to navigate to the folder containing the company’s information
- Locate the file location and that is C:\Users\Public\Public Documents\Intuit\QuickBooks\Company Files
- Then look for files with the same name as the company file extensions, such as .ND and .Tlg
- Perform a right-click on each file one at a time, then select Rename from the drop-down menu
- Add the suffix .old at the end of the file and repeat the process for the other two files.
Explore more information for QB Enterprise Editions to easily rectify QuickBooks Error 6000 77, just Choose CALL NOW. Meanwhile, you can use the LIVE CHAT option for your queries.
Solutions for QuickBooks Error 6000 77 in Accountant Editions
Solution 1: Perform modifications in the Firewall & Security Software Settings
The Internet connection is required to complete specific QuickBooks tasks that are blocked by your Internet security software or Firewall settings. Changing these settings can make it easier for the software to connect to the Internet which also helps you to resolve QB error code 6000 77.
For Windows Versions
The steps need to be performed to make changes in the Firewall & Security Software Settings:
- Step 1: Go to your system’s Advanced Settings and configure your firewall ports automatically
- Step 2: If the firewall ports are dynamic, manually configure them
- Step 3: If you have numerous QuickBooks year versions, you’ll need to add a Firewall port exception for each one.
Let’s check out the steps to use Advanced Settings for the Windows 7 Firewall to create exceptions for specific services.
Windows XP, Vista, and 7
Before you begin, disable all firewalls on your machine, including the Windows 7 firewall. To install firewall software, do not utilize Remote Desktop Connection (RDC) or a similar tool. Connect directly to your Windows system, install and configure the firewall to allow connections to and from RDC, and then rejoin RDC. Otherwise, the remote connection will be blocked by the firewall, and you will be unable to access your system.
Step 1: Choose Security Settings
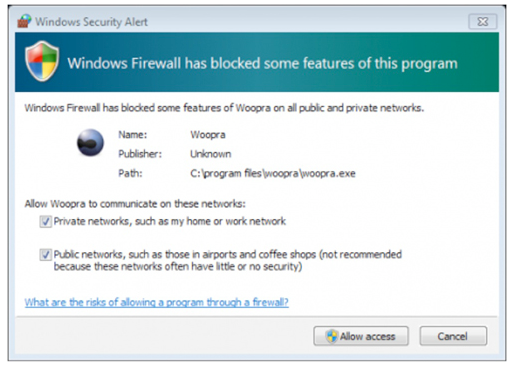
- Outside applications are immediately blocked from accessing your computer, and the firewall prompts you to take action. Allow access by clicking “Allow” and then following the procedures below, or prohibit access by clicking “Cancel”.
Step 2: Allow programs through the Firewall manually
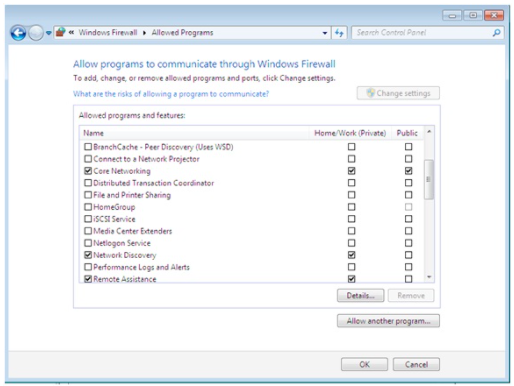
- Open the “Control Panel” from the Start menu to manually let a program over the firewall
- Select Windows Firewall from the System and Security menu
- In the left column of the window, click Allow a program or feature through Windows Firewall
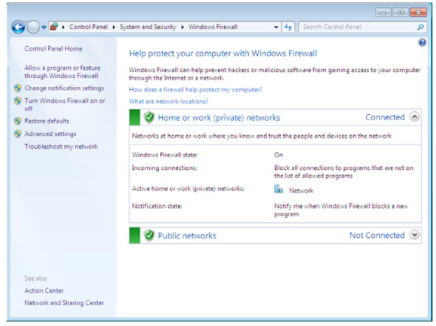
- In the “Allowed Programs” window, click on the “Change Settings” button
- Select the application or feature and whether you want to make it available to all networks for home/work (private), public, or both
- To save your changes, click “Ok”.
Step 3: Generate a Rule to enable services
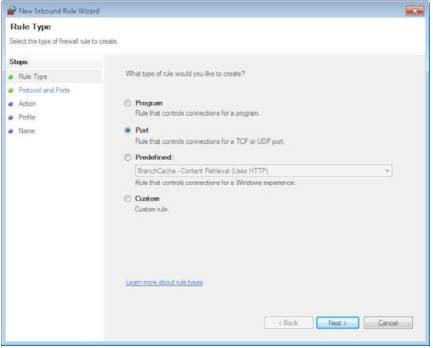
- Create Rule type:
- Select the “Advanced Settings” tab
- In the left column, click on the “Inbound Rules”
- On the right side of the window, select “New Rule”
- In the New Inbound Rule Wizard, select Port followed by clicking “Next”
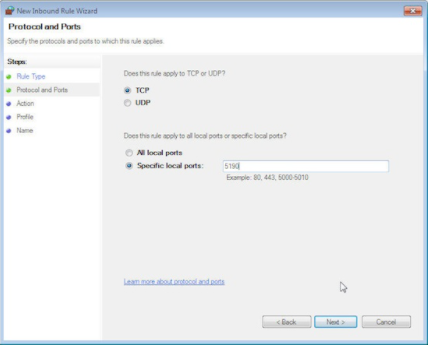
- Specify rule protocols and ports:
- Choose between TCP and UDP (which protocol this rule will apply to)
- Select Specific local ports, then specify a port number (80), a range of port numbers (5000-5010)
- After that, click “Next”
- Specify the rule actions:
- Click Next after selecting Allow the connection
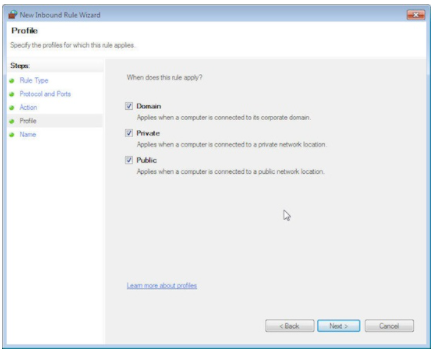
- Specify rule profiles
- Depending on your profiles, you can choose when this rule applies.
- Click Learn more about profiles in the lower part of the window to learn more about profiles.
- Only select all of the profiles (Domain, Private, Public) if you want requests from this port to pass past the firewall regardless of the connection/profile type
- Once done with the above step, click on the “Next” button
- Specify rule name
- Assign a name to this rule
- To add the new rule, click “Finish”.
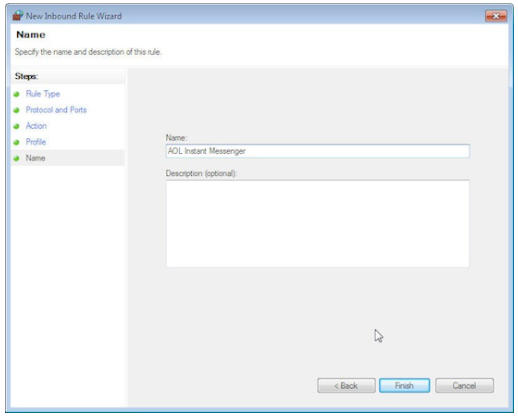
Step 4: Enable logging to view denied incoming connections
- On the left-hand side of Windows Firewall, choose Advanced Settings, then Properties
- Select the Public Profile option from the drop-down menu
- Next to Logging, click the Customize tab
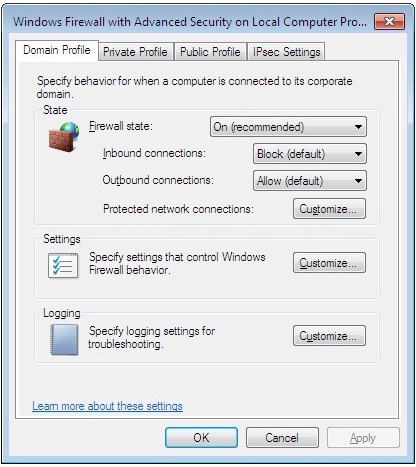
- Customize your logging Settings:
- Select “Yes” from the “Log dropped packets” pull-down menu
- Click Ok followed by hitting “Apply” and then “Ok” once again.
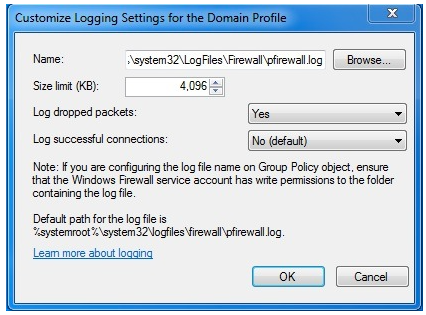
Step 5: Ensure Firewall is enabled
- Select “System and Security” from the Control panel
- Under Windows Firewall, click Check firewall status.
Windows 8, 8.1, and 10
Turning the firewall on and off as well as allowing an application is the most fundamental Windows 8 Firewall setting. Depending on the sort of network to which you’re connected, Windows 8 lets you filter both inbound and outbound traffic, as well as create rules and exceptions.
The Windows 8 firewall is enabled by default and is far more powerful than previous Windows firewalls. It runs in the background as a service and is completely unnoticeable. Microsoft Windows Firewall is an extremely effective security solution that was previously only available through advanced third-party firewall software.
- You can move your cursor to the top right corner of the screen or simply press the Windows + C keys together to select the Settings option
- Within the Settings tab, click on the Control Panel
- Select the “System and Security category” tab
- From the right pane of the system and security option, select the “Windows Firewall”
- In the left-hand column, click Turn Windows Firewall on or off.
- The Customize Settings window displays whether the firewall is enabled or disabled for both Private and Public network settings.
Through the Windows Firewall, allow programs to run.
- Allow an app or feature through the Windows Firewall option by clicking the Allow an app or feature through the Windows Firewall option
- Find and pick the program whose permissions you’d like to update
- All programs that are allowed to pass through Windows Firewall are listed in the Allowed Apps box
- The list is open for editing by default
- Click “Ok” after you’ve finished.
For Mac version
This simple firewall blocks unneeded network service ports when allowing you to define exceptions for specific services on your PC. Open the Apple menu (the blue apple icon in the upper left corner of the screen) and pick “About This Mac” to find out the version of OS X that you’re running.
Setting Up a Firewall: Mac OS X 10.2.x – 10.5.x
Step 1: Open the System Preferences
- Select System Preferences from the Apple menu
- Open the “View” menu at the top of the screen and select Sharing
- Or, simply click on the Sharing button in the “Internet & Network” portion of the pane.
Step 2: Activate the Firewall
- Select the Firewall option from the drop-down menu
- Under the tabs on the left side of the pane, look for the option named “Firewall On” or “Firewall Off”
- If you notice a “Start” button under the firewall, click it to activate it
- The firewall is already activated if you see a “Stop” button
- If you can’t click the Start button because it’s grey, click the lock icon at the bottom of the pane and type your password when prompted.
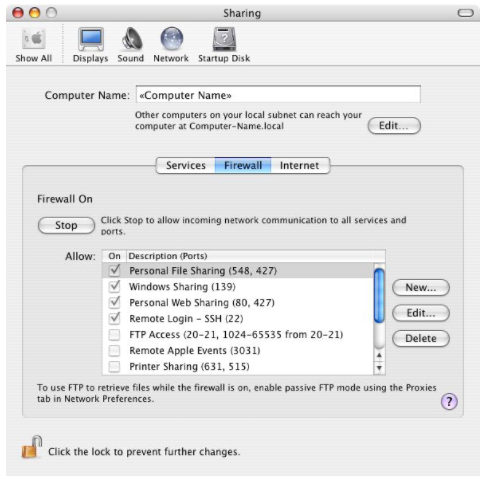
Step 3: Create exceptions for certain programs or Services
- All services checked on the Services menu on Mac OS X automatically open ports
- Open more ports in your firewall to make exceptions and let these services through if you use services like Retrospect Backup or iTunes Music Sharing on your PC
- Close the Sharing pane to save your changes if you don’t need any more open ports
- Keep the Sharing pane open under the Firewall tab and click on the “New” button to make more modifications.
Step 4: Finish and save your changes
- From the Port Name using the drop-down menu, choose the service you want to add
- If the required port name is not listed, choose Other from the drop-down selection
- In the Port Number, Range, or Series: box, type the port number
- In the Description field, type a description of the additional service
- To add the new exception to the firewall, click “Ok”
- To save your changes, close the Sharing pane.
Setting Up a Firewall: Mac OS X 10.6.x and above
Step 1: Open your System Preferences
- Select System Preferences from the Apple menu
- In the System Preferences box, click the Security & Privacy icon.
Step 2: Activate the Firewall
- Select the Firewall option from the drop-down menu
- If the Turn On Firewall button is grayed out and you can’t click it, go to the bottom of the window and click the lock symbol
- When prompted, enter your administrator password
- Turn on the firewall by pressing the “Turn On” button
- Toggle the Advanced option on
- Choose the firewall configuration which you want
- Click on the Ok button
- To save your selections, close the Security & Privacy pane.
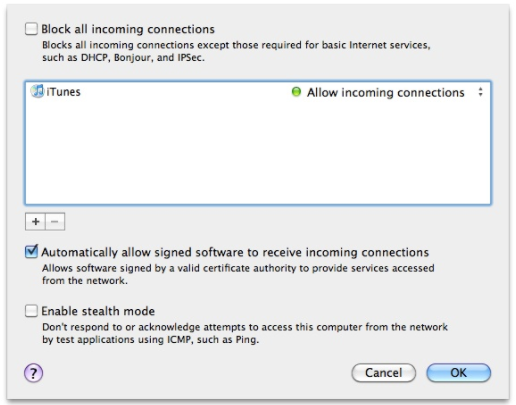
Step 3: Create a program exceptions
- In Security & Privacy, select the Firewall tab
- Select Firewall Options from the drop-down menu
- Select the plus sign (+)
- Locate the application you want to add as an exception
- Select Add from the drop-down menu
- For each program, you want to add to the exceptions list, repeat the procedures above
- By clicking the up or down arrows to the far right of the application name, then selecting the appropriate option, you may choose whether to Allow incoming connections or Block incoming connections for the programs in your list
- Click the OK button
- Save your choices by closing the Security & Privacy pane.
Solution 2: End all the QuickBooks tasks using the Task Manager
- First, open the Task Manager in the Windows Operating System
- Next, you have to press the Ctrl + Shift + Esc keys simultaneously on your keyboard
- The Task Manager window appears on your desktop
- Make sure you’re in the Processes tab
- If you’re already in another tab, switch to the Processes tab
- Look for the QuickBooks processes that are running in the background
- After that, click on the QuickBooks processes one by one
- Once you’ve chosen QuickBooks, you’ll need to go through the background process
- On the bottom right hand side of the window, click on the “End Task” button
- As mentioned above, you must end all QuickBooks tasks by selecting them and clicking the “End Task” button
- Close the “Task Manager” window once you’ve completed ending any QuickBooks-related background tasks
- To check for issues, restart your computer and open the QuickBooks software with the company file.
Solution 3: Download the latest release of QuickBooks
- Open QuickBooks as an administrator and run it
- Go to the Help menu in QuickBooks and select “Help”
- After that, select QuickBooks Desktop Update from the drop-down menu
- On your screen, in the newly opened window
- Select “Update” from the drop-down list
- To select everything, go back to the “Update” tab and click on “Mark All”
- Then save the changes by pressing the “Save” button
- Now select “Update Now” from the menu bar
- Select the Reset option by clicking on the Reset Update checkbox
- Now that you’re ready, select Get Updates from the drop-down menu
- Close the QuickBooks software after installing the updates
- When QuickBooks asks if you want to update it, click “Yes”
- Restart your computer after you’ve completed the update installation.
Update QuickBooks Desktop for Mac to the most recent version:
You can follow the instructions below to update the QuickBooks Desktop for Mac:
- To check for QuickBooks updates, hover over the drop-down menu, then click and select check for QuickBooks updates
- If a newer version is available, you must then click on install and update
- You may be prompted to choose install and re-launch in the following step
- QuickBooks for Mac will automatically launch after the upgrade procedure is completed.
Do you want Experts team on the phone CALL NOW or Do LIVE CHAT, if you are still facing QuickBooks Error 6000 77 on your Accountant Editions.
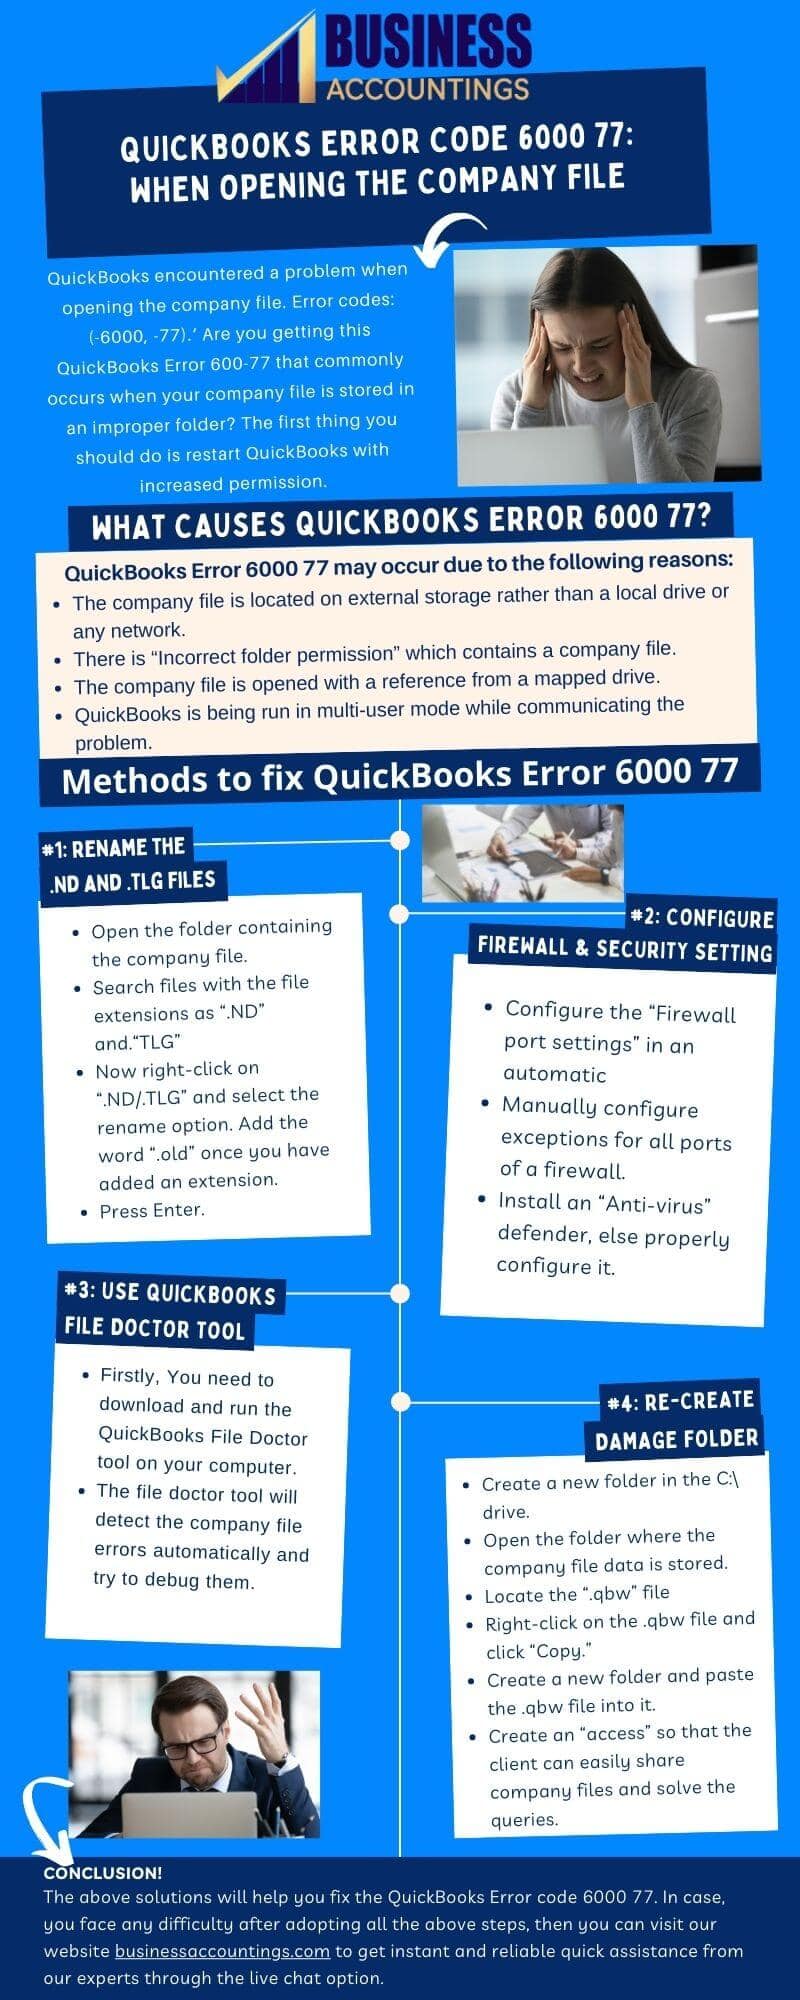
Infographic to Resolve The QuickBooks Error -6000, -77
How to reach us?

Get Expert’s Advice to Fix Your All Accounting & Bookkeeping Problems
FAQs
How to restore the backup file of QuickBooks if there is damaged data while fixing the QuickBooks error 6000, 77?
1. First of all, open QuickBooks desktop on your Windows system
2. Then click on the File menu option
3. Further, select the option Open or Restore file
4. Now click on the Restore a file option
5. Choose the backup file that you want to restore to your QuickBooks account
6. Open the file properly by clicking on the Open button after selecting the file
7. The file opens up in your account and you are done.
Does this QuickBooks error 6000, 77 happen in any of the QuickBooks desktop versions or editions?
Yes, this is the error that happens when you are opening the company file in QuickBooks. So it encounters in any of your QuickBooks versions (2021, 2020. 2019, 2018, 2017, etc.) or editions (Pro, Premier, Enterprise, Accountant, etc.). So, you must identify the reason and then implement the solution to get it to fix.
How to download and run the QuickBooks Database Server Manager if there is an issue with it and encounters the QuickBooks error 6000, 77?
This can also happen when the Database Server Manager is corrupted or damaged or not installed on your server or network with your QuickBooks account. Then you have to download and run the QuickBooks Database Server Manager.
The steps are as follows:-
1. For this, you have to download and install the QuickBooks Tool HubDownload the tool then save the file
* Go to the saved file and double-click on it
* It starts the installation
* Follow the shown instructions to complete the installation
2. After completing the installation, go to the icon of the tool hub
3. Right-click on the icon and select the Run as Administrator option
4. A pop-up message displayed on your screen to make changes to your system then click on the Yes button to allow
5. Go to the Network issues option
6. In this, click on QuickBooks Database Server Manager
7. You have to scan your company file
8. Click on the Scan Folders option
9. Then select the Browse option
10. Choose the folder having your company files
11. Click on the OK button to start the scanning
12. After the scan, fix the issues and then you are done.
