IRS W-2 form is nothing but a statement containing the salary/wage paid information to an employee by his employer. This includes information on the taxes deducted from his paychecks. In preparing tax returns, the information on the W-2 form is essential for employees. Before going through the process of how to print W-2 in QuickBooks Desktop and Online, you must know the printing requirements.
What is a W-2 Tax Form in QuickBooks?
Every earning citizen of the nation has to pay income tax yearly, this amount works as a beneficial amount that the government takes from the people and then uses this amount for the development of the state and country. You don’t need to worry about paying taxes when you’re an employee, your employer deducts the amount from your paycheck and files the taxes for you. Therefore, an employer has to give a detailed account of the amount being deducted as tax from the salary of the employee. That’s where the W-2 form comes in.
The W-2 form provides you with a detailed description of the amount deducted from an employee’s account on an annual basis, which is then used to file taxes. A QuickBooks desktop authorizes an employer to easily generate this form for their employees.
Why is it necessary to withhold taxes?
If you are an employer, you will need to deduct some amount from your employee’s salary to file taxes. However, the amount deducted is transferred to the IRS at the end of each month. The employee is not ever aware that his employer takes a particular amount from his paycheck and files his federal taxes each month. Therefore, at the end of the year when you are calculating the return, the W-2 form assists you to calculate the exact amount.
Why is it necessary to attach a W-2 tax form?
At the end of the year, it’s very important to attach a W-2 tax form with the payslips you pay your employees. It authorizes you to have control over the amount that has been assimilated as tax and deducted from the return. Additionally, if you are an employee, the W-2 form will help you understand the tax deductions to be made from your pay slip. The W-2 form should always be attached to the pay slip paid at the end of the fiscal year.
Now, let’s understand the printing requirements required for QuickBooks Online and QuickBooks Desktop W-2 forms.
Few things that you have to do before and after printing the W-2 forms
- Save the draft for the W-2 form – You have to click on the Save as PDF option in the Payroll Tax Form window. This button is shown on the bottom left side of the screen. After that choose the location to save your form as the draft. For that, click the Save button to do it.
- When you e-filing or print in QuickBooks Desktop then it automatically archives W-2 forms in QuickBooks – In the window of Payroll Tax Form, the automatically creates an archive when I e-file or print box is selected. You get this option on the bottom left side of the Payroll Tax form window. This saves the form automatically in the PDF format in the default location.
- How to access the archived forms when there is no active subscription of payroll – You can access your archived W-2 forms in case the subscription plan has expired and you have not bought it yet. You can search the archived W-2 forms in the system for the folder having archived data without opening the QuickBooks program. The location of the files is C:\Users\Public\Documents\Intuit\QuickBooks\Sample Company File\QuickBooks XXXX\(Write Company name) Tax Form History. You have to select the folder in the location that has your archived form which is required. The folder name includes 941, W-2 with its name.
Requirements for printing in QuickBooks Desktop
Before you print the W2 form, it is pretty important to know what and all requirements you need to have:
- To print W-2 in QuickBooks Desktop, you need to use black ink and print it on paper.
- Make sure that you use the supported version of QuickBooks Desktop.
- You have to have W-2 documents that operate with your printer and payroll service.
- Make sure that you have an active Payroll Standard or Enhanced Service for QuickBooks.
- Using blank / perforated paper or pre-printed laser printer types.
- Check that it is consistent with the QB version of Payroll.
- Use the preprinted forms for your inkjet printer now.
- It is also important to have the latest tax table of Payroll.
3 Steps Guidelines to Print W-2 in QuickBooks Desktop
Once you have finished with the Desktop printing specifications, let’s review the steps for printing W-2 forms:
Step 1: Open the W-2 form from QuickBooks Desktop

- In the beginning, go to the Employees section and then click payroll tax forms >> W-2s
- Next, click the payroll forms process
- Choose tax statement transmittal and annual Form W-2/W-3 wage
- Then hit the “Create form” button

- In case, you need to file the forms of all your employees then select all employees
- Along with that, hit the last name of the employee
- Add/Introduce the year of the form you are printing and then press OK. Only one version of the tax form is saved for QuickBooks Desktop. If the QuickBooks 2017 version of the form is already available, but you need to print W-2 forms for 2016, you need a newer version of the form to use it.

- You have to pick the employees to print the form. You have to click on review/edit if you haven’t read all your W-2 forms. To continue the printing process, you need to click on the submission form. Also, to print the type, choose the workers. If your W-2 forms have not been reviewed, click review/edit

- At last, hit the print/e-file button.
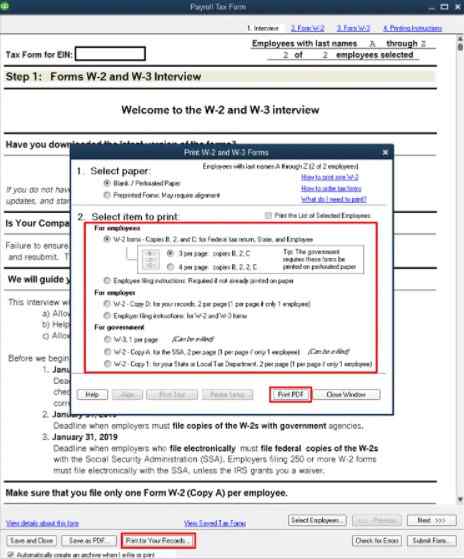
Step 2: Choose the paper type and item as well to print in the W-2 and W-3 forms window
- In the very first, choose the option preprinted forms or blank/perforated paper
- Under the section of the select item to print, you have to select for whom you want to print
For Employer
- W-2 – Copy D: for your records, 2/page.
- Instructions for employer filing: for W-2 as well as a W-3 form.
For Employees
If you’re using perforated/blank paper
- 4/page: copies B, 2, 2, C
- 3/page: copies B, 2, C
- Instructions for Employee filing: Needed if not printed on paper already
If you’re using preprinted forms
- Copy 2 of W-2: for your State or Local Tax Department, 2/page.
- W-2 – Copy B: for the annual tax return of an employee, 2/page.
- W-2 – Copy C: records for an employee, 2/page.
- Instructions for Employee filing: Required if not already printed on paper.
For Government
- W-2 – Copy A: for the SSA, 2/page.
- W-3/page.
- W-2 – Copy 1: for the Department of State or Local Tax, 2/page.
Step 3: Export the form and start printing in your PDF Reader
- You need to do a printing test if you are using preprinted forms.
- Now, you need to print your PDF by clicking on it.
- Finally, start from inside the PDF Reader with the printing process.
Printing steps for W-2 forms in QuickBooks Online
Requirements for printing in QuickBooks Online
- Before preceding the steps for printing the W-2 type in QuickBooks Online, there are a few things to consider:
- You must print employee W2s on 4-up horizontal blank perforated paper.
- Please ensure that black ink is used.
- You should have a QuickBooks Online Payroll subscription that is active.
Check out the process to print W-2 forms in QuickBooks Online:
- From the QuickBooks file, go to the Payroll Tax Center (PTC)
- Now choose Employee and then Payroll Center
- Next, navigate via the File Forms tab and choose View/Print Forms and W2s
- Feed the PIN for your payroll subscription service and press OK
- The W-2 page should now have a list of employees. If not, you will need to tap on View/Print W-2 Forms for All Years.
- Tap on the employee’s name from the list and open the W-2 form. If it doesn’t open, press CTRL+ALT while clicking the employee’s W-2.
- Choose View Reprint and confirm that the form has a reissue statement watermark. The watermark is added automatically when you tap to reprint a W-2 form in QuickBooks.
- Now open the paper using Adobe Reader and print them on perforated paper.
If you don’t have a perforated paper you can use another good quality paper to reprint the W-2 in QuickBooks. Before you terminate, provide your employees with the W-2 Filing Instruction Form.
Print, Save, and then Email W-2 Forms with Adobe Reader
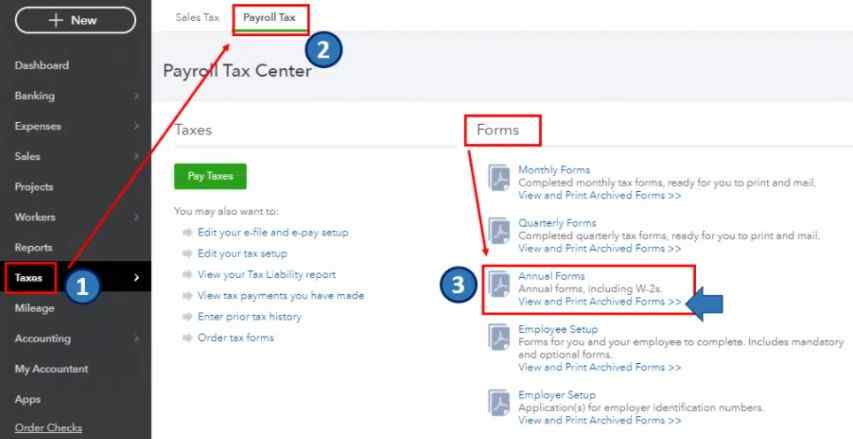
- In QuickBooks, open the Payroll tax center
- Click on Employees
- Then further select Payroll Center
- After that, click on the tab File forms
- Click on the option View/print forms & W-2s
- You have to add a payroll PIN and then click the OK button to proceed
- Now, you have to select the View employee W-2 forms
- Click on the employee name to print the W-2 form
- Then follow the instructions of adobe that help you in opening the form in the Adobe Reader
- Click on the file then click on the Print
- Now go to the File menu
- Then select the option Save a copy
- To save a copy you have to select a location and then click on the Save button to save it
- Now if you want to email this W-2 form then select the file
- Click on the Send then click on Page by email
- Attach the file in the email and send it to the concerned person.
How to Reprint W-2 in QuickBooks Desktop?
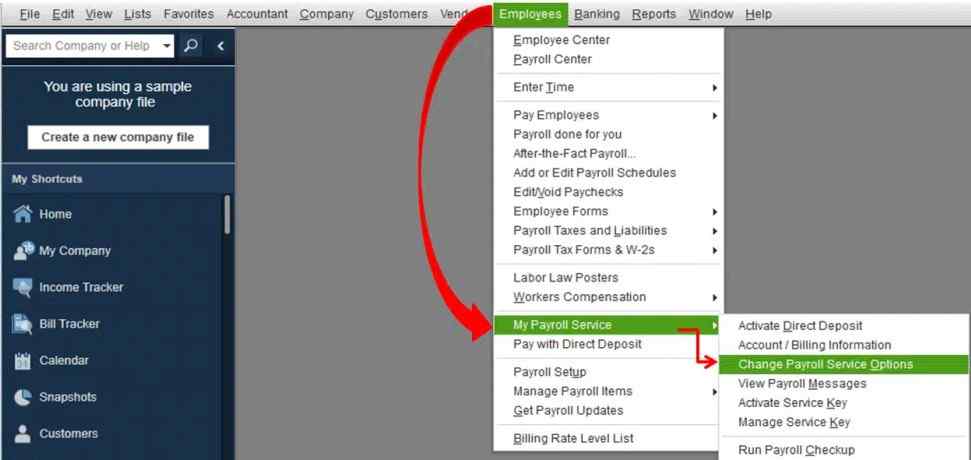
- Click on the Employees menu in the QuickBooks Desktop
- Select the Payroll Centre
- Click on Annual Form
- Choose the employee from the drop-down menu for whom you want to reprint the W-2 form
- After that, click the W2 copy B, C, 2
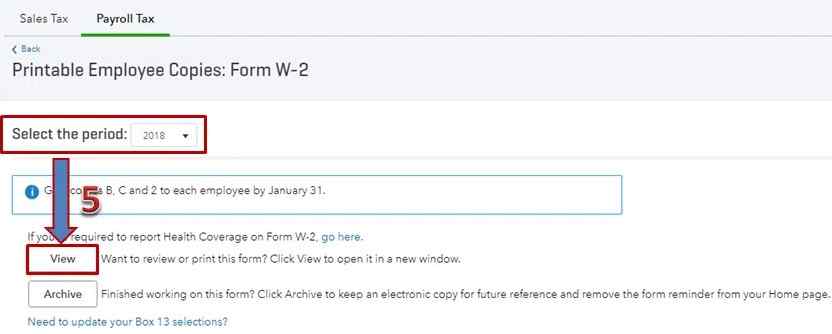
- Mention the year then click on the View Reprint
- In this, it requires the Reissued Statement words in case of reprinting the forms
- The form opens up in the new window in the form of PDF after clicking on View Report
- Then click on the button Continue
- You can use paper that is Blank or Perforated or simple plain paper to reprint the W-2 form
- Click on the File menu then select the option Print to print it.
Conclusion
You can save time by printing the W2 form in QuickBooks Online and Desktop. Printing W2 from QuickBooks also helps you to skip the step of manually entering the worker’s information. The above-provided step-by-step instructions help you to easily do how to print W2 in QuickBooks Desktop and Online. Additionally, you are also going to learn the requirements to print the W-2 form.

Get Expert’s Advice to Fix Your All Accounting & Bookkeeping Problems
FAQ
-
Can I still access my archived forms even if I no longer have an active payroll subscription?
You can still access an archived form even if you no longer have an active payroll subscription. Without using QuickBooks Desktop, you can go to the folder that contains the.pdf form and open it.
1. Go to the C:\Users\Public\Documents\Intuit\QuickBooks\Sample Company Files\QuickBooks 20xx\(Company Name) Tax Form History.
2. Click the folder of the archived form that you need. Folder names will have 941, W2, etc. in the title. -
How do I save a draft of the W-2 forms before I print w2 in QuickBooks Desktop?
First, go to the Payroll Tax Form page and click on the Save as PDF. Choose the location where you want to save a draft of W-2s and finally hit the Save button.
-
Why does the Printer Setup button gray out when I am trying to print w2 in QuickBooks?
Since we no longer use this function, the Printer Setup button in the Print W-2 and W-3 Forms window is grayed out. QuickBooks Desktop now prints payroll tax forms using the Print PDF feature, which exports the forms to a PDF reader. If you need to change the printer settings, you must do so in the PDF Reader software.
