QuickBooks provides a simple straightforward method for its users to print from 1099 and 1096 on QuickBooks Desktop. But if you’re new users then this task can be proven slightly difficult. The basic guideline is that if the payer is able to monitor or direct only the result of the job and not the things that will be done and even how it will be done, an individual is an independent contractor.
Check IRS requirements before creating a vendor in QuickBooks Desktop to understand whether the vendor comes under the Independent Contractor classification. To explore more, read this article as it is designed to help you with how to print Form 1099 and 1096 in QuickBooks Desktop.
The process to print 1099 and 1096 forms in QuickBooks Desktop
Very first, you need to review the IRS requirements before creating a 1099 vendor in QuickBooks Desktop to identify whether your vendor falls under an Independent Contractor category. Here are provided a few key points below to begin setting up your independent contractors:
Related Post: QuickBooks Printer Library Error Chat Now
Six Steps to Set up an Autonomous contractor
- In the beginning, launch your QuickBooks Desktop
- Next, go to the Edit tab and then select Preferences
- Now, choose 1099 for tax
- Go to the tab named Company Preferences
- Click Yes when the option “Do you file 1099-misc forms?”
- At last, select Ok to save the settings that you have made.
Six Steps to Add a vendor in QuickBooks
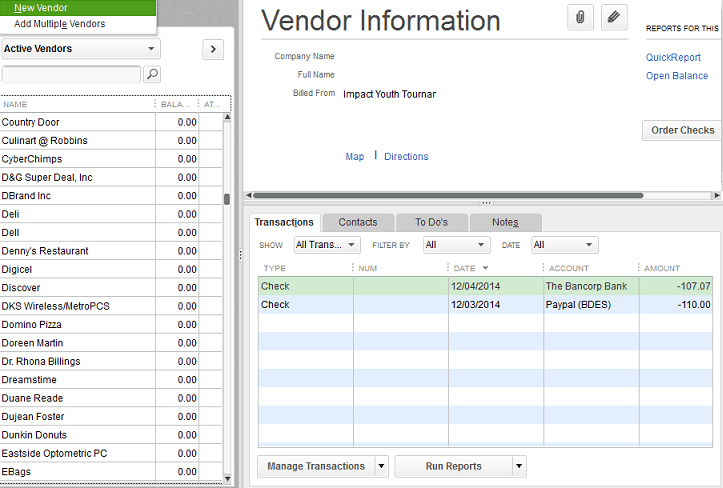
- The very first, open Vendor and then select the Vendor Center
- Tap the drop-down button and pick the New Vendor option
- Type a supplier name of your choice to be listed in the Vendor Name field. This will be found under the Vendor listing
- Fill details in the tabs.
- The supplier can be modified to include additional details.
- Select OK.

Four Steps to Set up Vendors to get 1099-MISC in QuickBooks
- In the beginning, open Vendors and then select the Vendor Center.
- Find the supplier’s name and do a right-click.
- Tap on Edit Vendor.
- Go to the Address info tab and verify the Details.

Eleven Steps to Set up an expense account for vendor payments in QuickBooks Desktop
- First, go to the Edit menu and select Preferences
- On the left side, you can find Tax: 1099 and select it
- Next, move to the Company Preferences tab
- Now, “Do you file 1099-MISC forms?” and then select Yes on the top
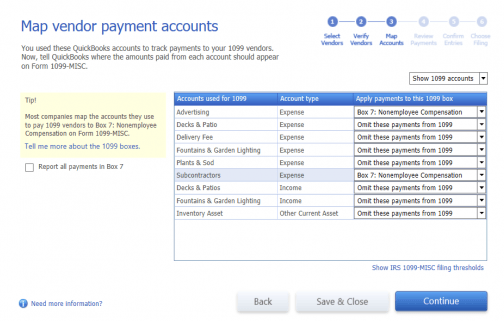
- Map the account to boxes on Form 1099-MISC
- After that, QuickBooks 1099 Wizard will open
- It will list the QuickBooks Desktop accounts that track payments to your 1099 vendors
- Click the drop-down menu in the Add payments to this 1099 box column, or pick the perfect 1099-MISC box
- With Box 7: Non-employment Benefits, most vendors are charged, but you would definitely plan to ask a tax professional first before selecting the box to use
- For each account noted, you need to pick a 1099-MISC box or select Skip these payments from 1099
- Once the accounts have actually been mapped, press Save & close.

Related Post: How to Delete a Vendor in QuickBooks Chat Now
Seven Important pointers need to consider to print 1099 and 1096 in QuickBooks Desktop
- In the address field, placed the required state abbreviation and postcode.
- The supplier’s name must appear in the first, middle, and family name boxes in the case of an individual vendor.
- If you know the business name but not the name of the person, leave the company name box empty.
- Choose the Taxes Setup button.
- Select a vendor qualifying for 1099.
- Enter the supplier’s tax obligation ID number in the Vendor Tax ID area and click OK.
- For other 1099-eligible vendors, you can perform the steps (2 to 6).
Five instructions Steps to print 1099 and 1096 in QuickBooks Desktop
It is always remembered that Forms can only be printed in single-user mode, and to do so, you need to have 1099 and 1096 forms pre-printed. You may also opt to e-file the IRS with your 1099 forms.
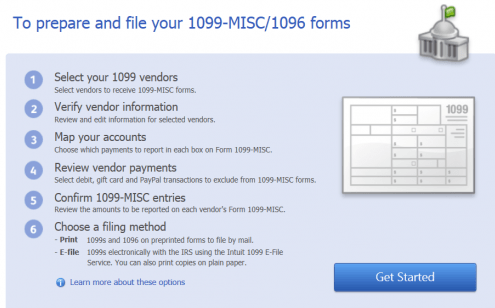
- Via QB Desktop 1099 wizard, verify your 1099 information.
- At step 6, pick the filling form in the wizard and press Print 1099s. To get a print, read the post, and click OK.
- Choose a set (of date) from which the 1099s were paid, and then click OK.
- Pick the 1099(s) form you want to print, and then press the button to print.
- You can press Preview 1099 and the alignment can be verified. To get the form aligned:
- Firstly, in the upper menu bar, click File
- Then click Set Up the Printer
- Then close 1099s/1096 from the Type Name list
- Click the Align button and, as necessary, change the alignment
- In order to save your changes, press OK and then OK again
- Select 1099(s) that you want to print and press Print 10999(s)
- In order to print 1096, press the Print 1096 button.
Related Post: Working QuickBooks Vendor Records Chat Now
In Conclusion!
Hopefully, this article provides you all the details so that you can easily able to Print Forms 1099 and 1096 on QuickBooks Desktop. In case, you have more queries or facing difficulty during the printing process then you can feel free to connect with the team of experts via email at [email protected] or Live Chat available all round the clock to assist you with the best possible solutions.
Related Post:
FAQ
-
How do I know the minimum wage to complete the 1099 form before I issue or print form 1099 and 1096 in QuickBooks Desktop?
The payer will submit a 1099-MISC form if someone is paid more than $600. So, it is important to know the minimum wages and when you have to issue 1096 and 1099 form in QuickBooks Desktop.
-
What are the important tips that I should be aware of while printing forms 1096 and 1099 in QuickBooks Desktop?
Yes, there are a few things or tips that you can use when you print form 1096 and 1099 in QuickBooks Desktop:
1. With a page-oriented printer, make individual copies instead of all at once.
2. You do not collect your pre-printed forms before printing them. All of the Copy 1 forms can be loaded first. After all of the Copy, 1 form for a vendor has been printed, load the Copy 2 forms and get prints.
3. The IRS will receive copy A (non-perforated), while manufacturers and suppliers will receive copy B (perforated). A website may only have two vendors on it.
4. You’ll be prompted to pick -1 to put the print down or +1 to bring it up by Alignment.
5. This option can reduce or increase the size of the print by 1/100th of an inch. -
Why does the problem “Form 1096 prints with the 1099-PATR box checked instead of 1099-MISC” occur when I print form 1096 and 1099 in QuickBooks Desktop?
When printing type 1096, the checkbox for 1099-PATR at the bottom of the form is checked instead of the box for 1099-MISC which may happen due to outdated software. This problem can easily be fixed by upgrading the program. Or simply download and install the most up-to-date QuickBooks Desktop updates.
Here is the steps help you out with ease:
1. Go to the Help menu and then click “Update QuickBooks”
2. Next, click the tab called “Update Now”
3. After that, make sure that you select “Critical Fixes” at the end of the listing of updates
4. And then click on the “Get Updates” tab
5. As soon as the updates have been downloaded then restart your QuickBooks Desktop and try once again to print a 1096 type.